HAV Detection Tool is a free software for virtualization for PC Windows 7/8/10. It’s obtainable for Windows 7 customers to download and see whether their PC is compatible with the XP Mode.
Description for HAV Detection Tool PC Windows
It is a product whose author is Microsoft. It’s a reliable tool for those who are often afraid of changing their operating system.
In fact, that is a popular reason. They’re actually worried about switching the current PC because they think that they’re unable to utilize their old applications.
Fortunately, it’s not a crucial issue. You can swap to Windows 7 easily without influencing anything. Indeed, Microsoft has dropped into this system a new addition, XP Mode.
Major benefits
HAV Detection Tool is one of the best applications for PC Windows to use. With the existing app, you can carry out some important tasks.
A few advantages for users
Know if your PC is able to emulate Windows XP SP3 on Windows 7.
You are getting a cool utility to help you decide if your machine has the resources essential.
Check if your PC’s processor owns the HAV option (Hardware-Assisted Virtualization) or test if it has that option active.
From that, you will recognize if your personal computer can control hardware virtualization or not.
Messages
They will inform you of the present state of your PC, for instance,
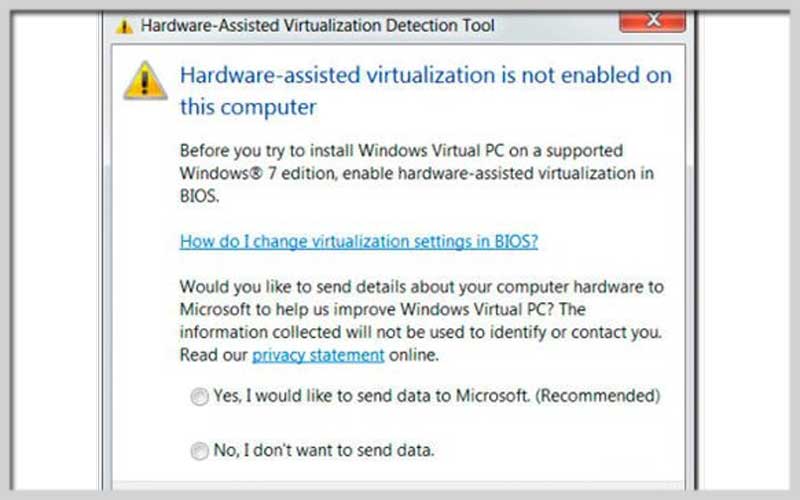
“This computer does not have hardware-assisted virtualization”
“Hardware-assisted virtualization is not enabled on this computer”
It means that you ought to complete the guide to turn on the option in the BIOS.
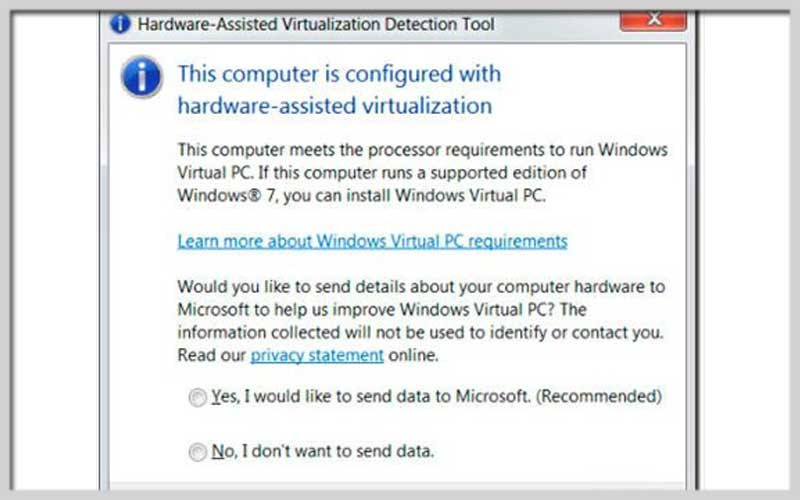
If you receive the message “This computer is configured with hardware-assisted virtualization, install Windows Virtual PC and XP Mode.
How to Install and Use the HAV Detection Tool
Introduction
The Hardware-Assisted Virtualization (HAV) Detection Tool is a utility provided by Microsoft to help users determine if their system supports and has enabled hardware-assisted virtualization features. This is essential for running virtual machines using Hyper-V or other virtualization software. Here’s a step-by-step guide on how to install and use.
Installing the HAV Detection Tool
Step 1: Download
- Open your web browser and go to the Microsoft HAV Detection Tool download page.
- Click on the Download button.
- You might be prompted to select the files to download. Ensure you select
HAV Detection Tool.msi, then click Next.
Step 2: Install the HAV Detection Tool
- Locate the downloaded installer file, typically named
HAV Detection Tool.msi, in your Downloads folder. - Double-click on the installer file to launch the installation process.
- If prompted by User Account Control, click Yes to allow the installer to make changes to your device.
- Follow the on-screen instructions to complete the installation:
- Click Next on the welcome screen.
- Review and accept the License Agreement by checking the appropriate box and clicking Next.
- Choose the installation folder or proceed with the default location.
- Click Install to begin the installation process.
- Once the installation is complete, click Finish.
Using the HAV Detection Tool
Step 1: Launching
- Open by locating it in your Start menu or by searching for “HAV Detection Tool” in the search bar.
Step 2: Running the HAV Detection Tool
- The window will open and automatically start the detection process.
- Wait for the tool to analyze your system’s hardware and configuration.
- Once the analysis is complete, the tool will display the results in a new window.
Step 3: Understanding the Results
- The results will indicate whether your system supports hardware-assisted virtualization and whether it is enabled.
- There are typically two key pieces of information provided:
- HAV Support: Indicates if your CPU supports hardware-assisted virtualization.
- SLAT Support: Indicates if your CPU supports Second Level Address Translation (necessary for some advanced virtualization features).
- HAV Enabled: Indicates if hardware-assisted virtualization is enabled in the system’s BIOS/UEFI settings.
- If your system supports and has enabled HAV, the tool will confirm that your PC is ready for virtualization tasks.
Step 4: Enabling HAV in BIOS/UEFI (if necessary)
If the Tool indicates that hardware-assisted virtualization is not enabled, you might need to enable it in your BIOS/UEFI settings:
- Restart your computer and enter the BIOS/UEFI settings. This usually involves pressing a key like
F2,F10,Delete, orEscduring the boot process (consult your motherboard or PC manual for specifics). - Navigate to the CPU or Advanced settings section.
- Look for an option related to virtualization (e.g., Intel VT-x, AMD-V, Virtualization Technology).
- Enable this option.
- Save your changes and exit the BIOS/UEFI settings. Your computer will restart.
HAV Detection Tool for PC Windows can exist with Windows XP SP2 and above. It’s entirely free for you to download and experience functions and features!
Screenshots