All ways in terms of Antares Auto-Tune: How To Use Auto-Tune will be available for you right now.
Nowadays, Auto-tune has become more common in the musical industry. It helps the voices more easy-to-listen and gives better audio to the listeners. One of the most fairly common is Antares Auto-Tune.
The Adjustment Modes In Auto-Tune
It contains two adjustment modes and methods to apply Auto-Tune. The first is Auto-Mode, which is supposed to be a “lazy mode”, and the second one is Graphical Auto-Tune, aka “Auto-Tune”. Auto Mode ultimately works in real-time, and analyses the audio when it comes through. Next, it appoints what to work to the audio. Modifying your settings can support it to create a better work of tuning, yet nothing alters your own ears on what requires to be tuned, or not.

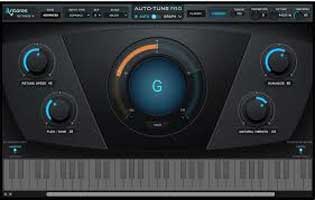
Auto Mode
Auto Mode is the default mode once running Auto-Tune. It is authorized to auto-analyze when it comes through, and tune-up or down to the closest note everything that comes through. As mentioned, there are several essential elements to focus on, since they will bring you better consequences. Focusing on several settings below, you could minimize Auto-Tune efforts to tune things that should not be, including vibrato and notes that are deliberately slurred from one note to another
Read more: Antares Auto-Tune
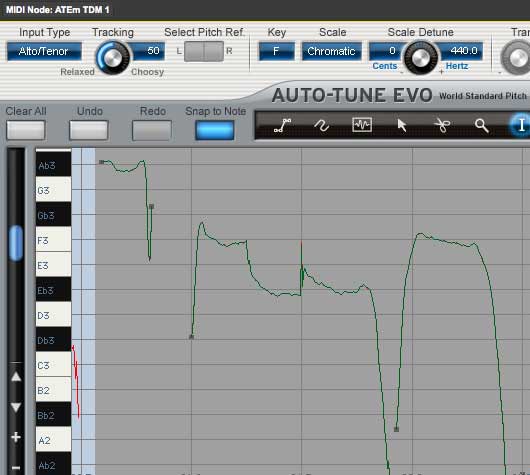
Input Kind: This ultimate setting support Auto-Tune pay attention to particular frequency ranges and kinds depended on the sort of content you are making effort to tune.

- Soprano – for female voices or high
- Alto/Tenor – for regular voices
- Low Male – for Barry White
- Instrument – for violas, violins and different kinds of monophonic instrument
- Bass Inst – for smaller pitched instruments and it is thoroughly regular to tune a bass guitar.
Scale: Setting the scale to the pragmatic key of your track will most exactly support to minimize bugs in auto-tuning. Chromatic, by default, is the scale, and perhaps most common, but setting the precise key of your song will reduce down the option of tuning from eleven notes down to the seven within fixed key. For instance, your song is in the key of “C”, which there is no sharp or flats. A singer sings a little bit beautiful on an attempt to sing a “C”. If the note sang is nearer to “C#”, Auto-Tune will attempt to tune the note high to “C#”, leading to a wrongly tuned note. Once setting the scale to C Major in this similar scenario, the singer would be forced to sing past “C#” for it to make a mistake and attempt to adjust to a “D”. This is a different good beginning point for Auto-Mode usage. There are plenty of various scales to select, and Auto-Tune, of course, is applied all over the world, and there are various existing scales to those in the world-wide applying adjustment tuning and scales.

Retune Speed: This is one of the essential settings to focus on, once it sets how quick Auto-Tune will tune a note, the same as a slide or blur time from non-tuned to entirely tuning process. Setting a very quick time will eliminate any distortions in the pitch, yet can lead to some fairly artificial consequence. However, one more time, this is an essential part of making the T-Pain/Cher effect. If this is what you are finding, you shouldn’t miss out on it.
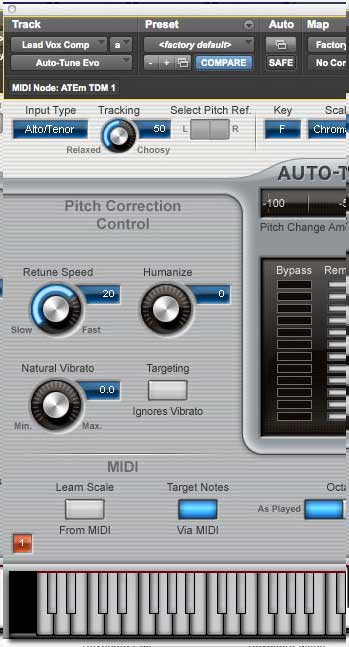
Humanize: This accepts to keep the notes to get a slower Retune speed than the shorted amount of time notes. Regularly, you would begin a setting of 0 meanwhile setting the Retune speed, assuring the entirely note that ask tuning are being tuned, then modifying the Humanize will support with maintained notes from not hearing too tuned, whilst still being quick enough to tune shorter the amount of time notes.
Natural Vibrato: This is separated from your pitch settings and is applied only to control the natural vibrato of the efficiency. Letting it at its default setting of 0 will have no impact on the official vibrato, yet modifying will minimize the count of vibrato accepted.
Targeting Ignores Vibrato: Toggling this on can support with what Auto-Tuning attempts to tune and what it skips. If you get a track with plenty of vibrato, try playing them on and find how they change. This is something that would be regularly applied with a key kind of vocal, accepting the natural vibrato to be skipped. Sub-vocal regularly should not have as much as vibrato, thus minimizing vibrato is favor.
Target Notes Via MIDI: This is fairly fun to try, alongside the quick Retune speeds. Once joining, Auto-Tune does not do anything until a MIDI note appears from a keyboard or MIDI track, then it tunes to the MIDI notes exist. Then, you could turn on a melody from a MIDI device, and the track will be tuned to what is playing.
Graphic Mode
Graphic Mode is the mode you will apply the most regularly once the quality is the central concern. The benefit: Graphics Mode accepts you to appoint which notes are to be tuned, and which will not, alongside with the separated settings for every tuned notes, rather than the general settings to be applied for all of every note changing into the Auto Mode.
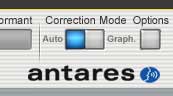
Correction Mode To Graph: Fairly self-expounded, glide, or hit on the correction mode from Auto to Graph.
Options:
Click on the options button close to the correction mode to proceed:

- Add buffer seconds: By default, it is more or less 240 seconds, which means 4 minutes at 44.1k or 48k sample rate, depended on your session settings. A song has the duration of about 300 seconds. There’s no need to put a quite high buffer count, since it uses much more RAM from your system. The highest setting of 14400 would create a 4-hour track.
- Default Retune speeds: After discovering about retune speed from Auto Mode, you could place the default retunes speeds for diverse tune settings in which will be shown instantly, yet this is where you place your default.
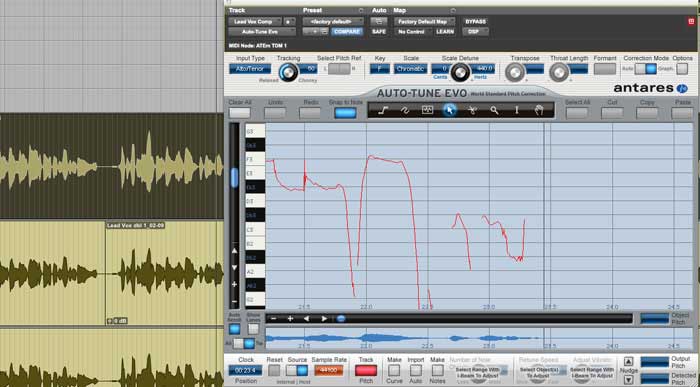
Track Pitch in Auto-Tune
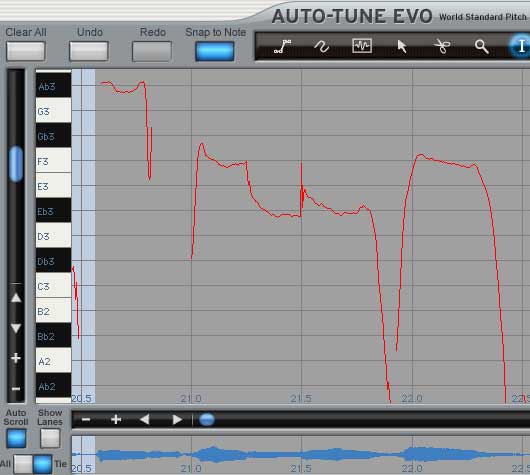
The initial thing you need to do is capture, or “Track Pitch”, our audio track into Auto-tune in order to analyze it, create the graphic representation shown the audio pitches, and reply precisely. This accepts Auto-Tune the time to reply fast alongside ramping in tuning before a note asks to be tuned, which is unable in Auto Mode, since it is only operating in real-time. See how to get started:
- Hit on the “Track Pitch” button: It will change into “Red” once activated to track pitch
- Play the track: Turn on your song from start to the end, or part by part. Provided that the entire information that asks to be tuned is in the track, then you could continue
- Disable the “Track Pitch” button: Self-expounded, but essential to begin tuning
Important!
Now, you get two options for tuning. You could draw or create automatically lines/curves or notes. The contrast is that notes are regularly simpler to operate with and consider an area of audio as a block, or note, and a line or curve accepts you to deal with bends in the middle of particular notes with a more planned.
The Tools

It will supply some tools, to begin with here and this will be described shortly below
- The Line Tool is applied to draw various segment lines on the pitch graph. It is regularly used once you desire to keep a straight pitch, or bend from one to another.
- The Curve Tool is applied when you want to draw with free-hand in pitch correction.
- The Note Tool is applied to draw the notes. There are some compulsory elements to appoint the pitches and cannot change them.
- The Arrow Tool is the most popular tool which is used, since it is how you choose and adjust available line or notes.
- The Scissors Tool is used to divide the available lines or notes into independent pieces for particular adjusting.
- The Magnifying Glass is applied to zoom. Simple click and tug a box around what you want to zoom into and start zooming.
- The I-Beam Tool is applied to choose an area of time to be applied to adjusted within, create the middle date. This is also popularly used tool.
- The Hand Tool is applied to displace the display. Click and keep on an area of the monitor, and then tug the screen to an area you want to view.
Automatically creating Lines and Notes in Auto-Tune
Select an area: Utilizing the I-Beam Tool, choose an area that you want to create notes or Lines/Curves.
Down at the bottom of the plugin close to “Track Pitch” is the choice for “Make Curve” and “Make Notes”, which are how we can generate automatically “Note” or “Curve”.

Make Curve: Hitting on the Make Curve button will auto-draw a curved line, suiting certainly the pitches captured in from the former Track Pitch function. You could view on the right, there are green lines tiling up the discovered event. These anchor points can be displaced separated by hitting on and tugging every anchor point up or down. This is specified and helpful in the key, but begins to drift sharp or flat as a note is being launched. You have to apply the Arrow Tool to interact with these points.
These are all ultimate aspects in terms of Antares Auto-Tune: How To Use Auto-Tune that we could show you. We all hope that it is useful for you to start your own project with Antares Auto-Tune. This will be an amazing app for you to try. It will support you to create the products with your style and your wish.