This section will show you the Easiest Way to Quickly Cut Audio in Audacity
Audacity has become more well-known for people who love the editing sound and more. The features of this app are also fairly various such as recording from the other apps, removing vocals, and much more. One of these features is the cut audio in Audacity. There will be 2 ways shown in this section. Let’s start!
The First Way: How To Cut Audio in Audacity at Every Step
To start this feature, you have to bear in your mind that Audacity is restricted to some possibilities and sometimes it will no longer get stable. If you are not familiar to use it, a suitable choice for you is to use other replacement methods.
Read more: Audacity
- Open Audacity to enable selection tool: Open Audacity and click File/Open to input the wanted audio file. Absolutely, you could see the “Selection Tool” at the peak of the icon bar. You need to assure this selection tool is available.
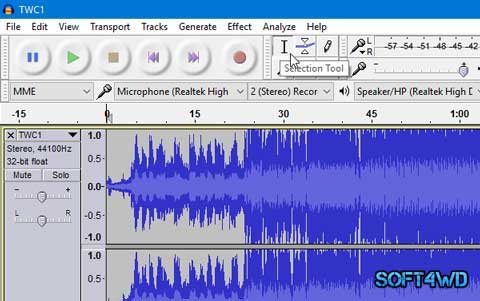
- Make a selection for audio to cut: Now you could adjust the audio in Audacity. First of all, you should know clearly in terms of the audio region where you wish to create a cutting operation. You could displace your mouse to receive a definite area. While you can click View/Enlarge to view if it meets your requirements.

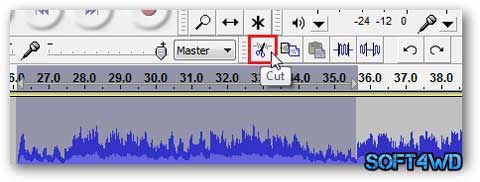
- Trim audio in Audacity: Before cutting your audio file, you should keep in your mind to press the “Stop” button, since you could not adjust it once the audio has been playing or pausing. Then you could instantly click the “Cut” button or press the shortcut, CTRL + X.
The second way: How To Cut The Audio In Audacity Alternative Losslessly – Joyoshare Media Cutter
This method is called Joyoshare Media Cutter. It is enough for your particular needs. Thanks to using this replacement, you are accepted to shorten your audio size by reducing it into small parts and eliminate the unwanted parts.
Read more: How to Record Audio From Any Windows 10 App Using Audacity

Moreover, this audio cutter has been launched with a good design that offers you an innovative acceleration processor, which supports you at 60X quicker speed. Alongside this, you could cut the audio and save it as any format that you like, such as MP3 or AIFF. You also get the ability to access to optionally adjust parameters for your audio, such as bit rate, quality, or sample. To supply more ability, you could gather different audio tracks from one source to the only one. The integrated audio editor also accepts you to edit the volume add sound effects and insert background music.
Key Features
- Trim MP3 on Windows 10 at the 60X speed.
- Eliminate the unexpected noise from the official audio
- Input from video, such as MP4, MOV.
- Mix with various audio pieces
- Assist diversities of audio and video formats
Here are the steps that you should follow to cut the audio
Read more: Remove Vocals from Songs Using Audacity
- Input audio file into Joyoshare Media Cutter: Run Joyoshare Media Cutter to allow it to do more job for you. You could receive two exist ways to insert the needed audio file. One is to click the ‘Open’ button and browser file in the available folder. The rest is to tug the file to the key interface. You should bear in your mind that only one audio can be processed at the same time.
- Decide a precise cutting area: Once input, Joyoshare will auto-play the audio file for you. To select the cutting area, there are two options for you. Displace the sliders in the progress bar and place a certain point. Or you could place both start time and end time into the temporal intervals. Also, you could hit the “+” button to create more than one audio section.
- Select the wanted output mode: Now press the “Format” panel to view all latent settings. There are “High-Speed” mode and “Encoding” mode in your view. Disparate output modes supply you with various options. If you desire to custom related parameters for your audio such as quality, sample rate, code, etc. you could choose the newer one.
- Start to cut the audio file: When it’s finished, click “OK” and roll back to the key interface. Press the “Start” button to start a cutting task. Then, you could discover the new file in the history folder option, which can be given to your friends.
We have introduced you two ways, which are the Easiest Way To Quickly Cut Audio Using Audacity. We hope these are useful for you while using this app. Share this with your friend if possible. We also hope to receive your comment to improve the quality of our site.