Here is the direction How To Use Ableton Live
A large range of producers, mixed media artists and musicians use Ableton Love to create the professional soundtrack for public events or in-studio. This supplies various features for digital audio workstations that support users to compose their own music. Let take a look at some ultimate step to use this app smoothly.
Inspecting your computer specifications
Creating audio asks the large memory and processing power. These next specifications are needed to use Ableton Live:
- Windows 7 (SP1), Windows 8 or Windows 10 (64-bit)
- 64-bit Intel Core or AMD multi-core Processor for computer, Intel Core i5 Processor, or quicker is suggested.
- 4GB RAM (8GB or more suggested)
- 1366*786 minimum interface resolution for computer
- ASIO compatible audio hardware for Link support (also suggested for the best audio expression)
- Internet access to allow Ableton Live and install supplementary content.
- Minimum 3GB hard-disk space (8GB is suggested)
- 76GB disk space for supplementary sound content.
Install Ableton Live on your computer
Ableton Live supplies three versions with the respective charges. A free 90-day trial is now free. You can also install Ableton Live. If your version of Ableton Live supplied an install disk, place the disk in your CD/DVD drive and launch the disk. If you do not possess any disk, you could utilize these steps to install and run Ableton Live trial version from the site:
- Access to https://soft4wd.com/pc-windows/audiomusic-production/ableton-live/ in a website browser (delete the space to access)
- Click Download
- Run the Ableton Live file zip file
- Double-click the “Setup.msi” file
- Click Next
- Tick “I accept the terms in the license agreement” and click Next
- Click Change to choose an install place and click OK
- Click Next
- Click Install
- Click Yes
- Click Finish
Open Ableton Live
It appears a gray icon that says “Live”. Hit on the icon in the Windows Start Menu.
Note: if you are working with the free trial, hit on Start your Free Trial in the central position of the page. This will run a website page that you could apply to sign in or create a new account.
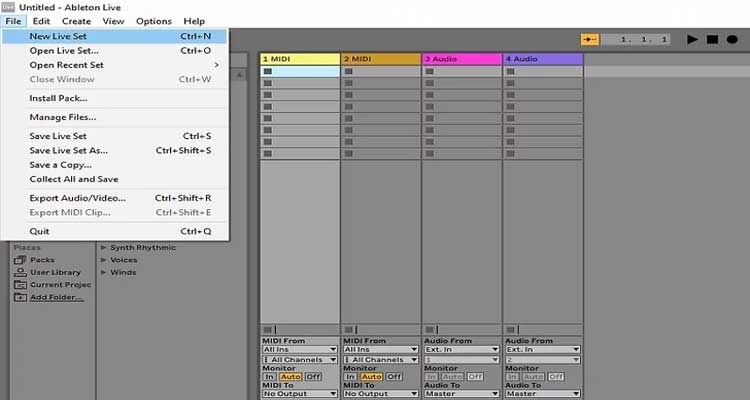
Start a new project
When you run Ableton Live for the first time, it will appear a demonstration project opens. Follow these steps to make a new project:
- Hit on File
- Hit on New Live Set
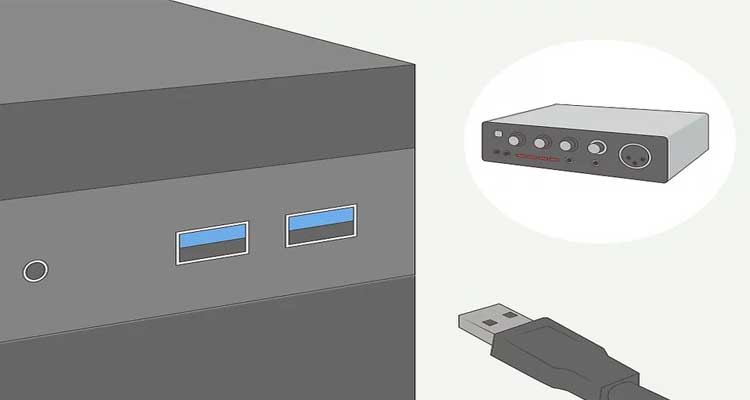
Install an audio interface
An audio interface is a device you applied to plug a microphone or instrument into your PC. Follow these steps to set up your audio interface.
- Plug your audio interface into an electrical outlet (if it asks to be plugged in)
- Link your audio interface to your PC utilizing a USB cable
- Click Options in the menu bar at the peak
- Click Preferences
- Click Audio
- Choose “ASIO” close to “Driver Type”
- Choose your audio interface close to “Audio Input Device”
- Choose your audio interface close to “Audio Output Device”

Switch between Arrangement mode and Session mode
Arrangement mode shows every track horizontally with a timeline that displaces fro, left to right. Hit on the icon with three horizontal lines with the higher-right corner to convert to Session mode. Hit on the icon with three vertical lines in the higher-right corner to convert to Arrangement mode.
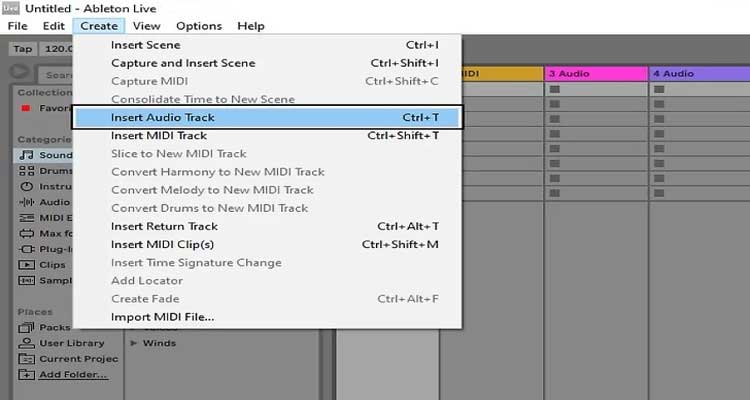
Create a track
There will be three-track kinds you could utilize in Ableton Live, MIDI, audio, and return tracks. MIDI tracks are applied for the digital instrument process such as a synthesizer or electrical drum set. Audio tracks handle the analog audio similarly to the sound from a microphone and or an electrical guitar. Return tracks handle the sound from audio and MIDI tracks and accept you to insert the supplementary effects. When you begin creating a new project, it boots with two MIDI tracks, two audio tracks alongside the effects, and official return tracks. Follow these steps to make a new track:
- Click Create in the menu bar at the peak
- Click Insert Audio Track or Insert MIDI Track (also, you could right-click and then click Insert Audio Track or Insert MIDI Track)
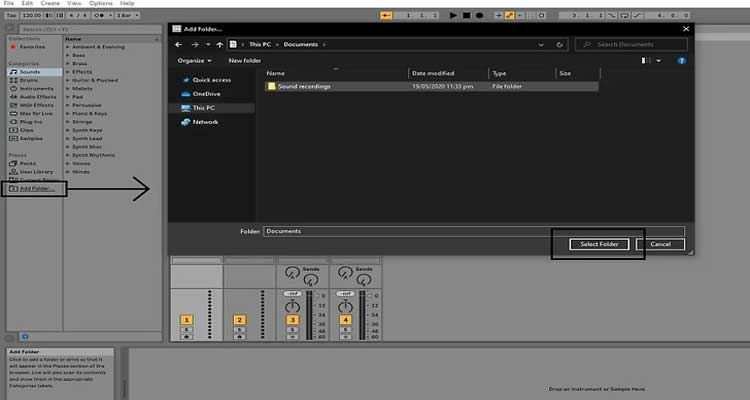
Insert a folder of sound clips to Ableton Live
If you get sound specimens or clips that you intend to insert to a song to mix, you have to insert the folder in Ableton Live. Follow these steps to insert a folder in Ableton Live:
- Click Add Folder in the panel to the left (if the panel does not appear to the left, hit on the grey icon with the play triangle in the higher-left corner)
- Adjust to a folder on your PC that includes sound and hit on it to choose it.
- Click Select Folder
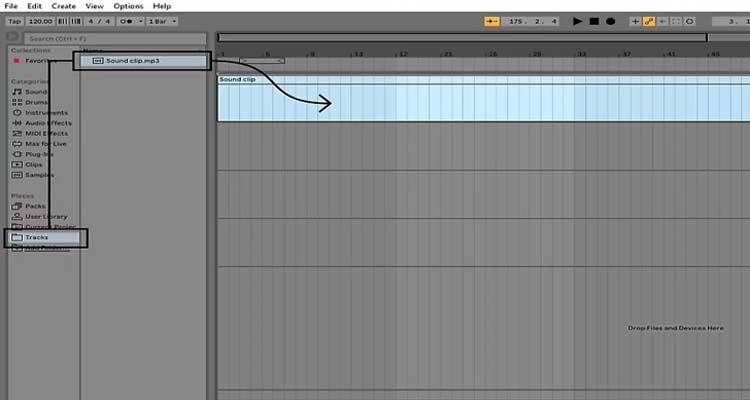
Add Sound Clips
To insert a sound clip in Ableton Live, hit on the folder that holds the sound clip you desire in the panel to the left. Then click and pull the audio clip you desire to insert to the track you want to insert. You are allowed to insert only MIDI clips (mid.files) to MIDI tracks, and you are allowed to insert audio clips (.wav/.mp3 files) to the audio tracks.
- Run beats, loops, and other samples from existing file folders in Ableton Live. One of the first steps to make a track is to find a way to know to place sounds that will create your files
- Populate the tracks by inserting samples following to rhythm and timing conventions. Via some trial and errors, you should get familiar with how to pull and drop samples into your track smoothly.
- Click and tug audio clips in the timelines to displace them around and sort them.
- To make a loop of track, click and tug to highlight the part of a track that you desire to loop. Then you right-clicking and hit on Duplicate. Duplicate as many times as you wish to loop your track.
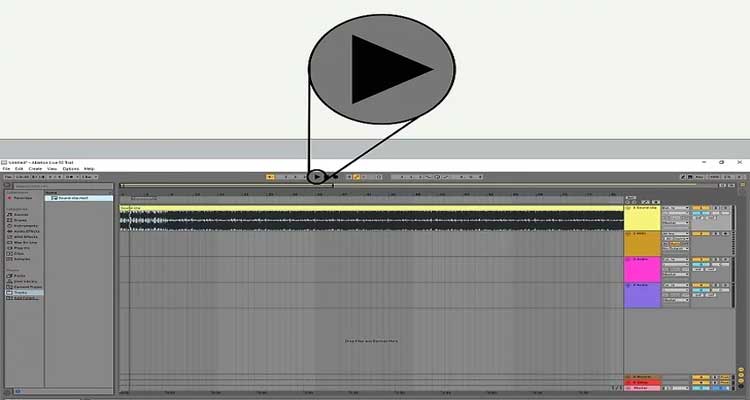
Click RUN (a black triangle) to run the tracks
It’s the button with a shape of a triangle and the color of black at the top of Ableton Live. This runs your tracks backs.
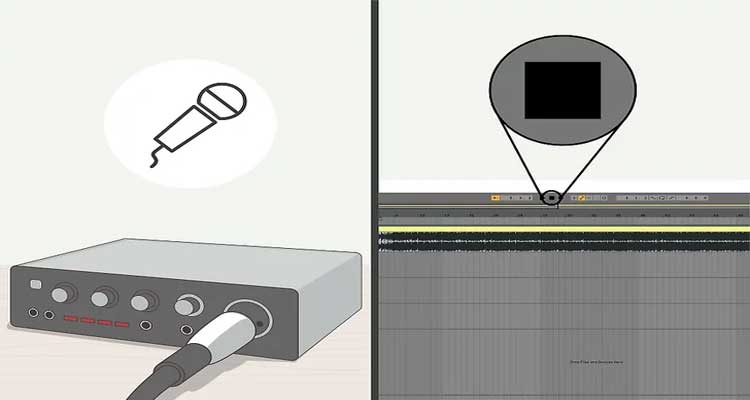
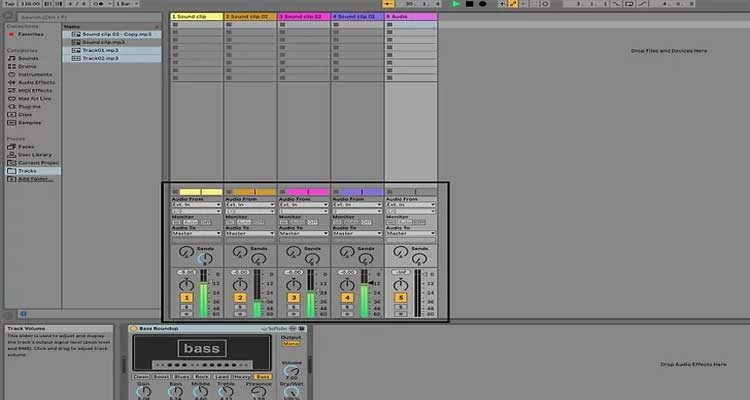
Record sound on a track
Follow these steps to record audio on a track
- Link an instrument or a microphone with your audio interface
- Click the icon with the circle on the track you wish to record on to equip the track
- Click “Auto” under the “Monitor” to accept your recording to be played in real-time.
- Utilize the second tug-down menu on the track to choose which input your instrument or microphone is linked with on your audio interface
- Click the icon with lines horizontally to convert to the Session view.
- Click before the place you intend to begin recording in the timeline.
- Click the solid circle button at the top line to begin your record
- Click the solid square button at the top line to finish your record
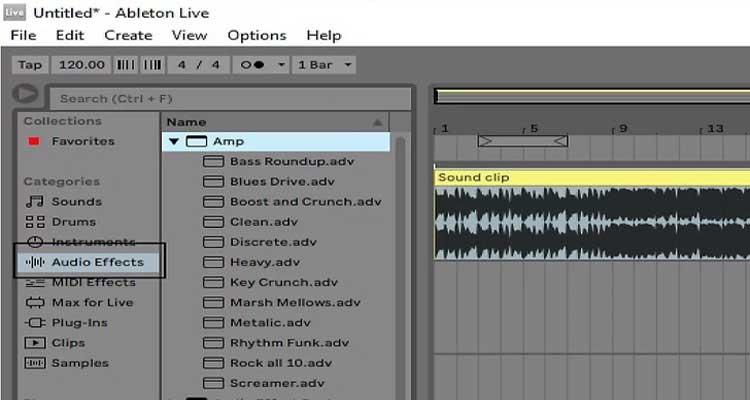
Add effects to a track
Ableton Live offers several integrated effects that you could apply to replace the sound of the track. You can apply ‘delay’ and ‘reverb’ to create an echo effect. You could insert an amp to emulate a guitar amplifier. You could insert an equalizer to conduct the tone of the track. Also, you could insert third-party VST Plug-in. follow these steps to insert an effect to a track
- Click Audio Effect in the panel to the left.
- Click the arrow icon close to an audio effect list to display all effects that the app supplies
- Click and pull an audio effect to the track you desire to use it too.
- Utilize the controls at the bottom of the monitor to adjust the effect settings.
Mix the tracks
Once you get enough tracks to create a song or sound sample, you could combine to make an accurate balance of sounds. You can increase or decrease the volume on exact tracks to combine them forward or backward. You could also rotate specified tracks to the left or the right speakers. Follow these steps to mix your own tracks
- Click on the icon with three lines vertically to convert to the Arrangement mode.
- Click and tug the arrow icon close to the sound meter at the bottom of the track to adjust the volume higher or lower on that track.
- Click and tug the icon that looks like a knob to rotate the track from the left and right speakers
- Click and tug the arrow icon close to the sound meter on the Master track to adjust the volume of everything higher or lower as liking.
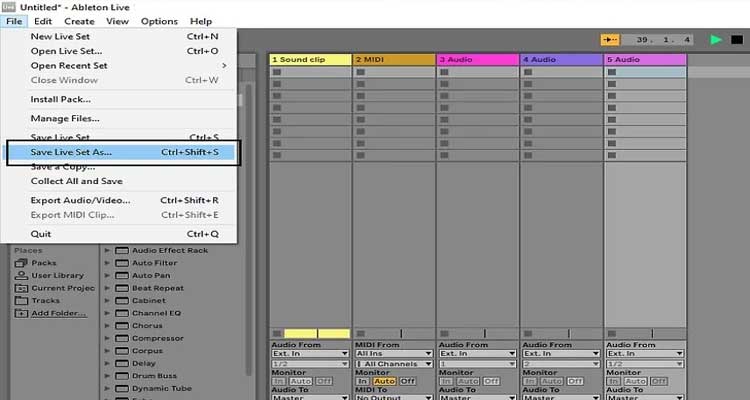
Save your project
Follow these steps to save the project
- Click File in the menu bar at the top
- Click Save Live Set as
- Write the name for the project close to Filename
- Click Save
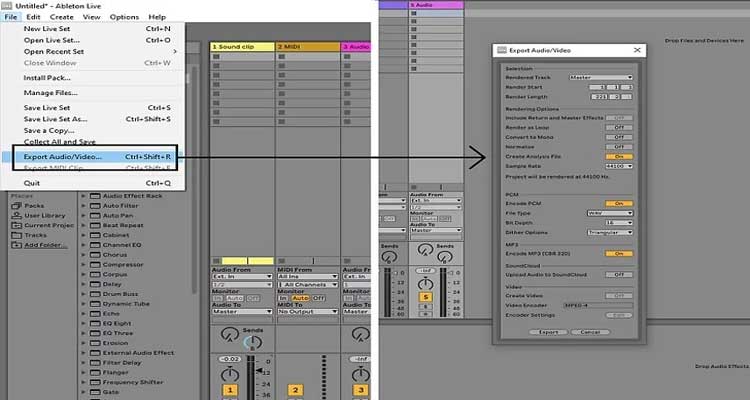
Export your project as an audio file
Once you have completed making your project, you could export it as an audio file that you could run in the different apps. Follow these steps to render your tracks as an audio file
- Click File in the menu bar at the top of the screen
- Click Export Audio/Video
- Choose a file kind by applying the drop-down menu close to “File Type”
- Click On next to “Encode MP3”
- Click Export
- Type the name for the audio file close to “File Name”
- Click Save
We have introduced you How To Use Ableton Live steps. You could obviously apply these basic steps to make and edit your own music. This will be a useful tool that supports for the beginner of the producer or even the expert of this genre.